Saturday, August 27, 2016

Any landing you can walk away from is a good landing

Saturday was once again time for the Bowman field Fly-in , so we made our annual trek to Livermore Falls and arrived just in time to see folks running in a mad dash up the field .
Not a good sign .
Once we made it to the runway we saw what the commotion was about .
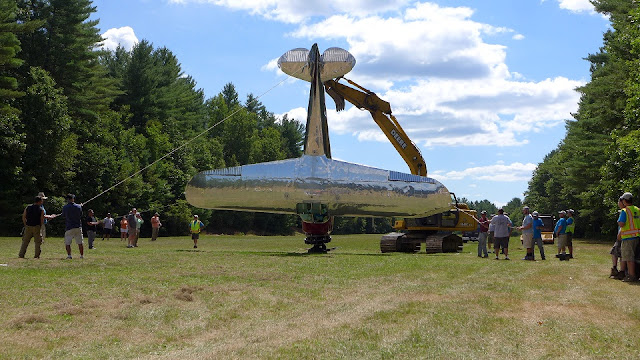
A gorgeous vintage Cessna 195 on its back . Seems the brakes were a bit touchy and they grabbed more than expected on landing . Thankfully no one was hurt seriously . A passenger had a nasty scrape on his head but that was the worst of it . As they say ; Any landing you can  walk away from is a good landing . You get bonus points if you don't break the airplane . Sadly no bonus points for this one .
Note the damage to the tail cone and vertical stabilizer .
The rescue guys were there in no time and they all pitched in . Of course this meant the runway was closed for the duration . No movements in or out of the field . The pilot is the guy on the far left side of the photo in the grey shirt, and the passenger with the bump on his noggin was the fellow in the lime green shirt next to him.
Someone made a call to the local man with the excavator, and within 40 minutes he was at the scene
Took a bit of brainstorming on the best strategy to get it back upright without doing more damage to it . They removed the wheel-pants, cowling and the spinner cone .
Some tires were arranged to protect the engine and prop , and guy lines were tied off at all ends .
In a minute it was hanging from the tail wheel . Top skin of the wing appears undamaged .
They wound up having to add another length of line to the tail guy line and tied it off to a vehicle to help steady it .
And they started to let it back down the right side up . Note the crinkled skin on the horizontal stabilizer .
And back on  its own feet again . The left wing tip was crushed during the accident .
It was towed up the runway .
And parked it on the sideline . It might be a while to get it straightened out , but it will fly again .
Well now that the excitement is over, it is time to walk the flight line and see who was there . This one a Home-Built BearHawk
And  new very expensive Carbon Cub
Another Carbon Cub on amphibian floats
An Aviat Husky
A 1940's Aeronca Chief
A hot-rod RV
A Taylorcraft from the 1940s
A Piper PA-12 with a fat belly pod keeps a J-3 Cub company
A nice Supercub
And a home-built Wag-Aero 2+2 Sportsman that got new wings and a new paint job last winter .
A 1930s Aeronca Defender
And another Super-cub with fat tires


And the gorgeous Travelair departs . . .

I almost forgot, the antique engine club was there as always with their Huff-and-Chuff motors

Including an old engine powered washing machine like the one I will be buying for Annie when we move off the grid .


Monday, August 22, 2016

Weekend haul

Our friends and neighbors Peter and Laura are avid yard-sale-ors . So on weekends they like to hit any yard sales that pop up in our neighborhood . At one place, four houses away from us they spotted some big lengths of used butcher block counter top , and came over to let me know . I wasted no time and for the price of one dead Benjamin I bought all that the fellow had .
A solid thirty two wide by twenty five inch deep piece
And a nine foot length with a sink cut out, and a bad end that was in rough shape breaking apart at the glue joints from water damage .
After cutting off the back splash and the sink cut-out together with the damaged end , I was left with a good fifty two inch length . And even the short twenty two inch damaged piece can be glued back together and cleaned up . If I were to buy this much butcher block new I'd be in to at least six hundred dollars . Never mind all the work involved in building it as I learned recently , just buying the Rock Maple for this I'd be in to at least two hundred dollars .
Then we went to see my parents and came away the the usual garden veggie load and a nice 242-B model Coleman gas lantern dad no longer had any use for as they have a nice new stand-by generator . A quick search on Flea-bay shows they go for as much as 200$
Built in Canada August of 1954
For comparison sake my 1970 vintage Kansas built model 200-A I saved from a dumpster I had on a job site about fifteen years ago .
Then on the way back home we stopped by a  yard sale and scored a nice Coleman Peak camping stove for five dollars . . .
. . . to keep the rest of my Bunsen Burners company . The green Coleman 502 was another trash day road side find from when we used to live in Portland .

Thursday, August 11, 2016

Opening a can of worms

A couple of them really .
Got a call from a neighbor about replacing some of the trim boards on his house in preparation for putting it on the market . Looked the job over and I gave him a labor plus materials price with a warning that the cost could easily go up once I peeled it open .
Cause it is kind of like Forrest Gump said ;  
"you never know what you gonna get when you open up the box"
Started on the garage corner boards. So far not so bad. But Oriented Strand Board sheathing with no tar paper over it is never a good sign .
Then I tackled the other back corner and . . .  Kaboom . . what a frikking mess
That is what a can of worms looks like when you open it up. OSB sheathing has turned to mulch .
From the weathering on the OSB you can tell it was left without siding for a long time . Likely several years . And then when they did put the clapboards on it they neglected to put any kind of tar paper under it . Inevitably as the clapboards weathered and leaked the OSB soaked water up like a sponge and turned to mulch .
They had however covered the framing , that also sat in the weather for at least a couple of years , in plastic . It is the only thing that saved the framing from rotting as well .
So I propped up the deck with some timbers , peeled the decking back , cut the rim joist off the deck and pulled off 5 sheets of OSB and replaced them with 5/8s plywood .
Then I covered it in Bituthane and galvanized metal and added a PVC 1x10 where the deck attached to the wall .
Trimmed the corner
Cut an inch and a half off the joists and installed a new rim joist . Added some spacing rings cut from 4 inch PVC pipe between the rim joist and the garage wall. Then I through bolted the deck back on the the garage wall with 8 inch Timberlock screws. Tedious fiddly work to get this part together as I had less than twelve inches working space .
Got the deck all back together and pulled out the side door as the striker side jamb was rotted at the bottom
Rebuilt the door jamb and reinstalled it and trimmed it out . Also replaced the lower part of the rake trim on the roof line .
Tar-papered the back part of the garage wall
And using some of the old salvaged clapboards I re-sided the back side of the garage .
Replaced the corner boards on the other end of the garage
Front of the garage also got new corner boards and new jambs and trim on the garage door.
On both sides
Tar-papered the rebuilt wall of the garage , and made clean cuts on the old clapboards .
And re-sided the garage wall with new cedar clapboards .
Can of worms number two , right in the corner where the breezeway meets the side of the house .
Peeled it all open and found more mulch
It was also about two gazilion degrees in the sun on that corner last Monday .
So I rigged up a tarp for some shade .
Had to pull the fascia board on the breezeway trim and the interior corner trim to replace a small patch of rotten OSB sheathing .
Bithuthaned, tar-papered, re-flashed, added new trim everywhere including the window
And got it buttoned up all in one day.
There was also some other minor bits and pieces of trim that needed replacing on the house but they were not much to talk about compared to what I have shown . And that is how you go from a nine-hundred dollar trim repair job to a thirty-five-hundred dollar can of worms .