Ever since we bought the house 12 years ago there has never been a proper front door on it. It only had one of those storm doors you can swap out the full length mosquito screen for a glass panel in the winter. As there is a proper door between the entry foyer and the house, when I rebuilt exterior of the house six years ago, the most expedient thing to do was pop the same cheap screen door back in.
And things being the way the are it got left like that for a long time,
mostly because the front foyer was the cat's favorite place to observe
the outside world. But we had to put her down a couple of years ago.
So last week I finally got motivated and put a proper door on the front of the house.
And finished the siding.
Problem now is I can't call it a tar paper shack any more and the tax assessor will surely jack up my property taxes. I am inclined to leave the front steps off, as it thoroughly confuses
the usual crowd of happy clapper holly roller bible pushers, political campaigners
and other undesired rif-raf.
Then last Sunday we noticed a definite Eau-de-Skunk in the wood shed behind the garage.
So I got to poking around and started what has become an annual autumn ritual, sorting my saved project remnants. I yanked everything out of the rafters . . .
and discover some critter has chosen my overhead storage as a suitable place to relieve himself
So I remodeled my rack system for more head space down the middle and less critter friendly toilet space.
Wednesday, October 7, 2015
Sunday, October 4, 2015
Shake and Bake powder coated bullets
In order to save money on components for handloading ammo, many folks cast their own bullets. The problem with cast bullets especially once you start pushing them beyond 2000 feet per second is that you get leading in the barrel. The .223 caliber is going near 3000 fps out of a modern semi auto carbine so up to now the word has been no-go on cast bullets for them. So you are limited to buying jacketed or plated bullets which cost about 20 cents with every trigger squeeze. Add to that powder and primer (not counting case cost) and you are pushing the price of store bough ammo at 25 cents a round. So some folks have been experimenting with powder coating their own cast bullets in order to make their own "polymer plated" projectiles. Apparently in Europe you can buy them ready made like that. So the basic idea works. The fly in the ointment is how to roll your own consistently without a big powder coat gun setup. Some folks have been using the dry shake and bake method with varying degrees of success. Pop the projectiles in a plastic tub, add a couple of teaspoons of coating powder, cover and shake away. Pour them out on a tray and bake at 400 degrees F for twenty minutes. So I figured what the heck lets give it a try.
A word with my friend Jonathan puts in an order for a discarded toaster oven from the Take-it-or-leave-it at the cape Elizabeth dump. Sure enough next day he calls back and provides us with the desired item. It was a bit nasty looking as if it had sat in someones garage for about 50 years. But after some elbow grease with some cleaner, a Scotch-Bright pad and paper towel the oven looks spick and span. A quick test and it seems in working order. As to actual temperature achieved I shall have to put an oven thermometer in it and see.
Five and a half dollars buys us some powder coat paint at the local Harbor-Freight
Some old soft lead .357 cowboy action round nose pills I had stashed away . . .
and some hard cast 157 grain .357 Semi Wad Cutters get washed in Xilol to remove all trace of oils.
Tossed with some powder and popped in the oven at 400 deg F for 20 minutes
And the results are promising but not the best and could really be improved upon. I think its a mater of technique.
Then I read that folks have had problems with the Harbor-Fright black powder and they had better luck with the red. So I bought a tub of that and gave it a try.
I re-tumble the soft lead round nose ones I originally coated in black along with some fresh hard cast SWC on the right in the pix and bake again. This time on parchment paper to prevent sticking to the aluminum foil.
The single coat SWCs are a bit better this time but could be improved.
The double coat soft lead round nose look more thoroughly coated this time but are still a bit lumpy. A sizing die should even them up a bit.
They definitely will need to be run through a sizing die as the .357 are now 360 thousands. I have yet to try loading or firing any of these. I think I need to experiment a bit with the method to improve results. Other folks are using a slurry method where they mix the powder with acetone and seem to be getting somewhat better adhesion. I think I will give that a try next.
A word with my friend Jonathan puts in an order for a discarded toaster oven from the Take-it-or-leave-it at the cape Elizabeth dump. Sure enough next day he calls back and provides us with the desired item. It was a bit nasty looking as if it had sat in someones garage for about 50 years. But after some elbow grease with some cleaner, a Scotch-Bright pad and paper towel the oven looks spick and span. A quick test and it seems in working order. As to actual temperature achieved I shall have to put an oven thermometer in it and see.
Five and a half dollars buys us some powder coat paint at the local Harbor-Freight
Some old soft lead .357 cowboy action round nose pills I had stashed away . . .
and some hard cast 157 grain .357 Semi Wad Cutters get washed in Xilol to remove all trace of oils.
Tossed with some powder and popped in the oven at 400 deg F for 20 minutes
And the results are promising but not the best and could really be improved upon. I think its a mater of technique.
Then I read that folks have had problems with the Harbor-Fright black powder and they had better luck with the red. So I bought a tub of that and gave it a try.
I re-tumble the soft lead round nose ones I originally coated in black along with some fresh hard cast SWC on the right in the pix and bake again. This time on parchment paper to prevent sticking to the aluminum foil.
The single coat SWCs are a bit better this time but could be improved.
The double coat soft lead round nose look more thoroughly coated this time but are still a bit lumpy. A sizing die should even them up a bit.
They definitely will need to be run through a sizing die as the .357 are now 360 thousands. I have yet to try loading or firing any of these. I think I need to experiment a bit with the method to improve results. Other folks are using a slurry method where they mix the powder with acetone and seem to be getting somewhat better adhesion. I think I will give that a try next.
Thursday, October 1, 2015
Harvest
It has been a prolific year for Pears
We have two trees I planted about eight years ago and both are loaded. Last year they only had about a dozen pears between them and all dissapeared one windy night.
Had to prop up a few of the branches as they were getting so heavy.
Plucked about a hundred of them off the trees as they were starting to drop in the wind and I did not want them to bruise. Haven't the faintest idea what variety they are but we had a couple of the ripened ones and they tasted nice.
Some were a bit lumpy but they should taste OK once they are ripe
We had way too many so I pawned of a few to neighbors and friends
Tomatoes were also the best I have grown in 12 years. No blemishes, bugs, cankers or diseases. The fact I kept them in my wood shed/greenhouse under-roof all year might have something to do with it.
So what do you do when you have an excess of tomatoes? Make cilantro sauce chicken and tomato pizza of course. Haven't yet figured out what we are going to do with all the pears.
We have two trees I planted about eight years ago and both are loaded. Last year they only had about a dozen pears between them and all dissapeared one windy night.
Had to prop up a few of the branches as they were getting so heavy.
Plucked about a hundred of them off the trees as they were starting to drop in the wind and I did not want them to bruise. Haven't the faintest idea what variety they are but we had a couple of the ripened ones and they tasted nice.
Some were a bit lumpy but they should taste OK once they are ripe
We had way too many so I pawned of a few to neighbors and friends
Tomatoes were also the best I have grown in 12 years. No blemishes, bugs, cankers or diseases. The fact I kept them in my wood shed/greenhouse under-roof all year might have something to do with it.
So what do you do when you have an excess of tomatoes? Make cilantro sauce chicken and tomato pizza of course. Haven't yet figured out what we are going to do with all the pears.
Tuesday, September 29, 2015
Yes we dig holes too
The back foyer/mud-room on the house started out life as an open deck. Someone along the way closed it in. I rebuilt it six years ago and changed the roof line from a dish-pan to a proper peak. The foundation posts were plain three inch by four foot steel pipes set on a flat rock about three feet down below grade. That is how they rolled 75 years ago. Last year I noticed the steel posts were starting to rust out at ground level.
I guess its a year for repairing rusty things. Including my truck, but more on that one in a later installment. The door to the foyer kept shifting so the bolt would no longer line up with the striker and it changed with the seasons. This meant that the whole structure was shifting. So a couple of weeks ago I figured it was time to do something about it and fix it right instead of moving the door striker with the seasons.
Time to dig it out and see how bad it is and learn what really is holding up the foyer.
The cheap Chinese copy of a Hi-Lift jack I bought at Tractor-Supply a few years back for about 25 $ comes in handy to level and hold the building while I take out the rotten pipe.
Install a new steel pipe with an eight inch Sonotube cardboard concrete form around it. For added protection and good looks I sleeved the steel pipe with a piece of stainless steel tube salvaged from some old pool stairs I had in my junk pile behind the barn.
Mix three bags of Quick-crete . . .
I guess its a year for repairing rusty things. Including my truck, but more on that one in a later installment. The door to the foyer kept shifting so the bolt would no longer line up with the striker and it changed with the seasons. This meant that the whole structure was shifting. So a couple of weeks ago I figured it was time to do something about it and fix it right instead of moving the door striker with the seasons.
Time to dig it out and see how bad it is and learn what really is holding up the foyer.
The cheap Chinese copy of a Hi-Lift jack I bought at Tractor-Supply a few years back for about 25 $ comes in handy to level and hold the building while I take out the rotten pipe.
Install a new steel pipe with an eight inch Sonotube cardboard concrete form around it. For added protection and good looks I sleeved the steel pipe with a piece of stainless steel tube salvaged from some old pool stairs I had in my junk pile behind the barn.
Mix three bags of Quick-crete . . .
. . . and fill the Sonotube. Note the concrete footing I poured at the bottom before fitting the pipe and Sonotube. This should keep the ground frost from moving the concrete column in winter.
Not bad results
There, that should hold it for another 75 years. I left the middle one alone as it is galvanized and has not rusted.
Sunday, September 27, 2015
Bituthane and Bondo
Reason # 7239 why I hate winter . . . . yes we do body-work too.
Last spring when I was washing off the winter grime some of the paint came off the lower end of the fenders on my wife's VW. Seems they were rotting out from the inside. So on Saturday I figured it was time to tackle the nightmare.
Why does this happen? Piss-poor design. The plastic wheel well liner traps sand and mud behind it. That layer there is about twelve inches tall and about an inch thick. And you don't know it is there until you remove the wheel and the wheel well liner.
Time to get serious and yank the fender to work on it properly and clean the front end of the rocker pannel.
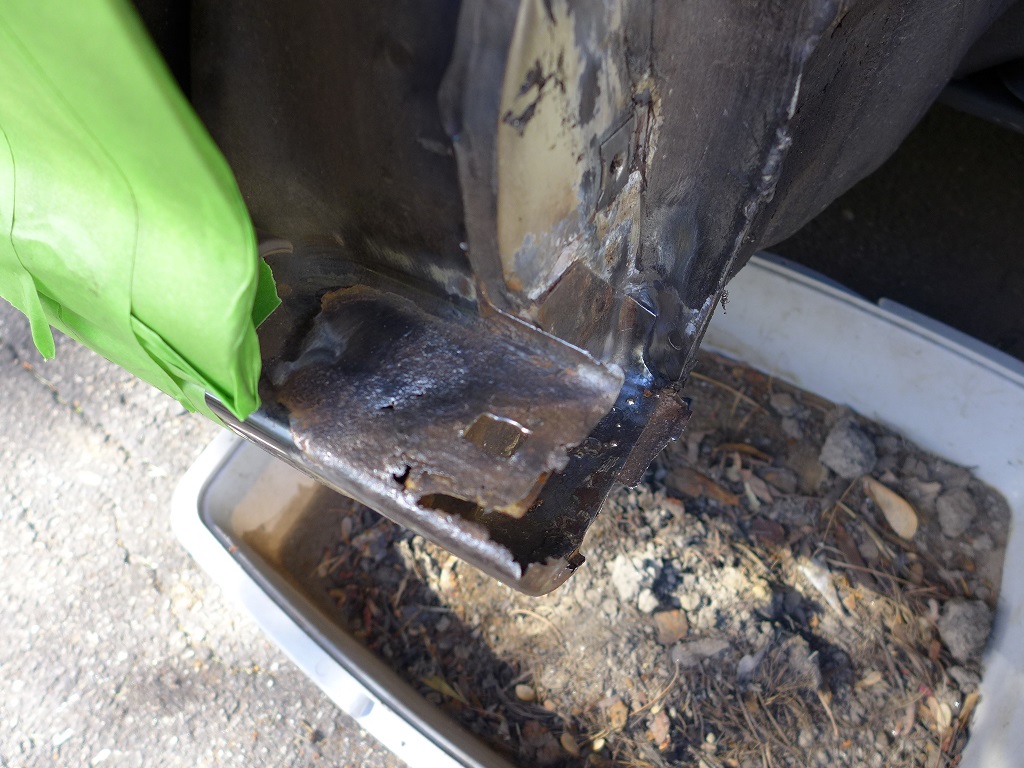
Which was also quite corroded
That is what came off the passenger side fender
A couple hours work with a steel brush on a drill gets me to bare clean steel.
And the driver's side looks just as bad so it gets the same tratment.
Remove that fender too, and grind on it for a couple hours, mask it off and hit it with Permatex Rust-Prep from NAPA. Essentially phosphoric acid in a spray can. Turns all remaining rust in to magnetite an inert element that won't rust.
Passenger side gets the same treatment. Note how it turns black. That is the magnetite part.
Inside of the fender gets the same treatment.. good enough for Saturday. Time to call it a day and let the rust converter do its thing.
Next morning hit the inside of the fender with self etching primer and then rubberized undercoating.
Indispensable stuff
Rocker panels get the same treatment
Then line the inside of the fender with Bituthane (Bituminous-Urethane) AKA Ice and Water Shield
Which while adding some more protection inside, provides me some backing on the Swiss cheese steel to . . . .
Apply some Bondo (body filler for yous fureiners)
A bit of sanding and some gray primer makes it look good enough . . .
To coat with some more rubberized undercoating.
Sunday 5 pm got the refinished fenders installed and adjusted so all trim lines look even. There that should hold for a while. Don't know what a body shop would have charged for the job but I figure that it makes a fairly decent 13th anniversary present for Annie.
Last spring when I was washing off the winter grime some of the paint came off the lower end of the fenders on my wife's VW. Seems they were rotting out from the inside. So on Saturday I figured it was time to tackle the nightmare.
Why does this happen? Piss-poor design. The plastic wheel well liner traps sand and mud behind it. That layer there is about twelve inches tall and about an inch thick. And you don't know it is there until you remove the wheel and the wheel well liner.
Time to get serious and yank the fender to work on it properly and clean the front end of the rocker pannel.
Which was also quite corroded
That is what came off the passenger side fender
A couple hours work with a steel brush on a drill gets me to bare clean steel.
And the driver's side looks just as bad so it gets the same tratment.
Remove that fender too, and grind on it for a couple hours, mask it off and hit it with Permatex Rust-Prep from NAPA. Essentially phosphoric acid in a spray can. Turns all remaining rust in to magnetite an inert element that won't rust.
Passenger side gets the same treatment. Note how it turns black. That is the magnetite part.
Inside of the fender gets the same treatment.. good enough for Saturday. Time to call it a day and let the rust converter do its thing.
Next morning hit the inside of the fender with self etching primer and then rubberized undercoating.
Indispensable stuff
Rocker panels get the same treatment
Then line the inside of the fender with Bituthane (Bituminous-Urethane) AKA Ice and Water Shield
Which while adding some more protection inside, provides me some backing on the Swiss cheese steel to . . . .
Apply some Bondo (body filler for yous fureiners)
A bit of sanding and some gray primer makes it look good enough . . .
To coat with some more rubberized undercoating.
Sunday 5 pm got the refinished fenders installed and adjusted so all trim lines look even. There that should hold for a while. Don't know what a body shop would have charged for the job but I figure that it makes a fairly decent 13th anniversary present for Annie.
Subscribe to:
Posts (Atom)