Monday, May 29, 2017

Progress on Ben's shack

As we took last weekend off for other events , Ben and I went up last Wednesday to make some headway on the shed . It was a brutal hot humid 90 degree day with no wind and lots of black flies .
Since the official photographer was not present we did not get any action shots and only remembered to take some pictures at the end of the day .
We did manage to set up some staging and got most of the roof trim done in preparation for the shingles . Though we came up short on material for the sub-fascia so I just tacked up some temporary three quarter inch thick scraps so we could get proper spacing on the aluminum drip-cap on the eves .
So on Saturday with much nicer weather we got a good start on things . We got some felt paper stapled on and the aluminum drip-cap on the gable end rakes .
Ben was a bit uneasy doing roof monkey duty .
But I got him started on the shingles and left him to it .
While I got busy building the front door .
Soon he was high enough to set up the roof brakets and move the planks up on to the roof .
And I sheathed the door .
Dressed it up with some trim and fancy hinges .
Looks rather horsey to me .
And before I knew it Ben had finished up with the shingles on the first side .
While Ben tore down the staging on the far side and moved it to the right side , I made up a window frame for the back gable end .
Just a quick and dirty frame to hold the glass we saved from the old salvaged sky-lights .
Good enough for a barn .
Soon enough Ben had us ready to get started on the second side of the roof .
We put up some felt paper  . . .
Ben was still shaky on the 2x4 walkers with his hard sole boots .
In no time we had put up half a dozen courses . But then the generator ran out of gas to keep the compressor going so that put an end to using the roofing gun .
So we set up the roof brackets and moved the planks up on to the roof .
And left Ben to peck away at it with the hammer .
It don't look half bad for a quick and dirty barn . Next chapter we'll finish up the eve-end sub-facia , make a couple more window frames , get those installed and put up some corner-boards .

Sunday, May 21, 2017

Powder coated pills for the Webley 38/200, target gongs, and a Stevens 66C from 1935

The Webley revolver in its various iterations was the standard British military sidearm for the better part of  eighty years .
First adopted by the British military in 1887 it remained in service until 1963 . It is still in production in India today as the IOF 32 revolver . The first versions were a big clunker in .455 caliber . Like a 45 colt but a case that is about half as long . Then about the end of WW1 the powers that be decided that the .455 was too much of an anvil to be lugging around and they downsized it to the 38/200 and called it the Webley Mark IV 38 . Mine pictured above was built in 1944 .
The 38/200 is a 38 S&W case with a 200 grain round nose soft lead projectile . But unlike the rest of the universe that had settled on a .357 inch bore diameter for 38 caliber , the Brits chose to use a .361 inch bore diameter . So standard store bought 38 S&W run a bit loose in the pipe . They are also only 145 grain projectiles and are loaded very mild for use in the weaker top-break pocket revolvers of the turn of the century . 
Seems a lot of folks who own the old Webleys are interested in recreating the original 200 grain 361 thousands diameter projectile load , but bullet molds in that size are hard to come by and rather expensive as they are all custom made . They cost more than I paid for the gun itself . But there are many ways to skin the cat . Some buy standard 38 cal molds and hone them out to .361 with a cast bullet and some valve grinding compound . That is one option . But why not kill two birds with one stone? Prevent leading in the barrel and increase the diameter of the projectiles at the same time .  So how about powder coating ? Essentially you are adding a jacket to the cast bullet and thus some thickness . I experimented with it a couple of years ago and though I made some I never actually loaded or tried firing them .

I had some soft lead round nose, hollow base Magtech pills which were ideal and miked out to about  360 thousands of an inch after a double layer of powder coating .
The Lyman cast bullet handbook provides some loading recipes .
Searching a couple reloader's forums and Hodgdons own page I came up with a reasonably mild powder charge for 157 grain projectiles in the short 38 S&W cases . I settled on 2.2 grains of Hodgdons HP-38 minus 10% as a starting load and can work my way up from there .
Don't they look pretty . The ones on the right are store bought Sellier and Bellot 145 grain round nose
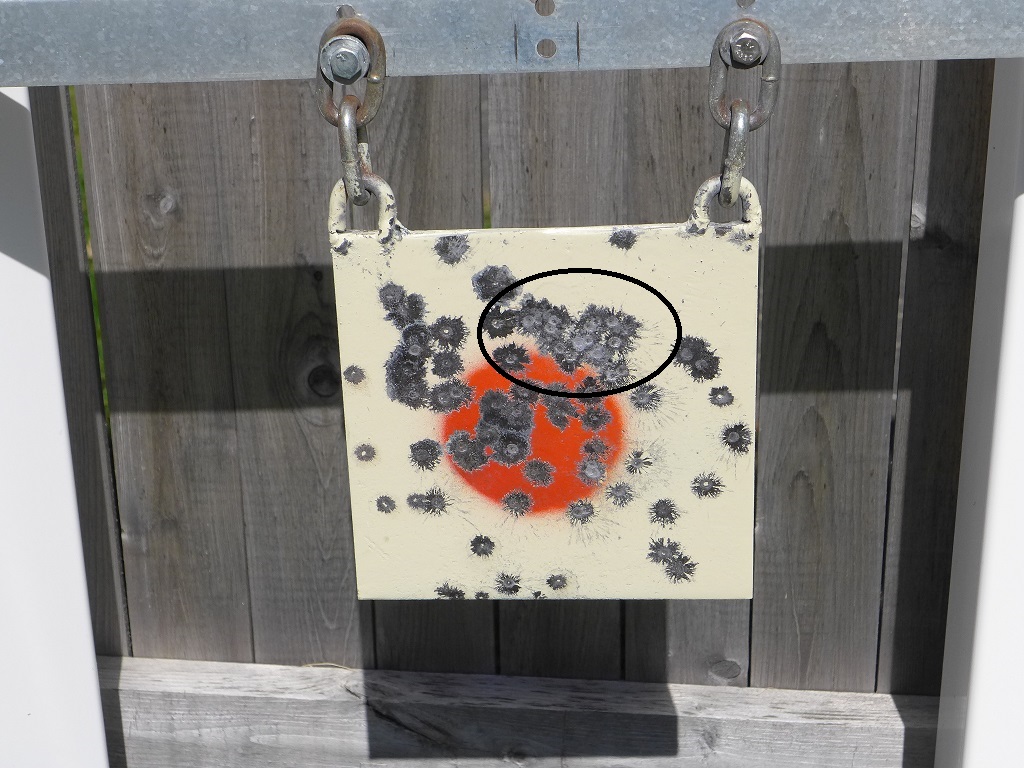
And at about 30 feet they prove accurate enough on my homemade six inch steel gong . Good enough for my bad eyes anyhow .
Made that gong out of some stuff I had in my scrap steel bin . Started with a couple links of chain .
A piece of quarter inch , six by six piece of steel plate
Some scrap channel iron . . .
 . . and with my cheap Chinese stick welder . . . .
I put it all together . . . then hit it with some spray paint for contrast .
Works real slick , it rings and moves so you know when you have a hit .
With Dad's old Stevens 22 I was doing about an inch and a half group from about 75 feet .
Stevens model 66C Buckhorn 22
Dad bought it cheap at a pawn shop a few years back . . .
. . . as the stock was cracked at the grip .
Seems someone thought it a good idea to use it as a club and cracked the stock in the process .
Built between 1931 and 1935 most of the original bluing is gone but the bore is nice and shiny and the edges on the rifling are clean and sharp .
Mr Google indicates the ones labeled as Buckhorn were built of hand select parts and were above average on accuracy . And if my lousy shooting is any indication I believe it . I just can't miss with it .
After removing the stock , I mixed some epoxy and thickened it with some wood dust , opened up the cracks in the stock a bit and filled them with the glue . Bound it with some electrical tape and let it sit for a few hours .
Before the glue was totally hard I scraped off the excess and it is good as new . I'll have to sand and refinish the stock some time .

Friday, May 19, 2017

Closing in the gable ends

As we had other plans for the weekend we made a run up to Richmond on Wednesday and got a little bit done on Ben's shack . It don't seem like much , and I definitely was not on my best game so there was a bit of three steps forward and two steps back , but we managed to get the gable ends closed in  and had no disasters that could not be corrected with plan B .
Framed out for a window and a vent up high on each of the gable ends . I had a couple of salvaged sky-lights we had originally intended to put on the roof but we got ahead of ourselves in the rush to sheathe the roof last weekend and never framed out for them . So we changed directions and decided to put them in the gable end instead .
Another one we kind of messed up was the collar ties . I should have put them on before we sheathed the roof so we could get them in above the top plate of the wall . So plan B , we cut them to twelve foot exactly and fit them to the wall studs under the top plate as ceiling joists and got a nice loft out of it .
See the gap between the window framing and the vent framing above . The top cross piece on the window framing should have been higher . Yes , The back wall was the first one I framed out and I neglected to add the inch and a half to my glass dimensions up-and-down for the thickness of the window casing I will be adding to the glass . So that was one of the three steps forward and two back . Had to waste some time fixing that .
Once that was fixed and the walls sheathed . . .
We ripped up some #3 1x12 pine and added some trim to the roof rakes .
 The wild ends will get trimmed off after we add the fascia and soffit on the eves . Next time we will set up some staging on the eve ends to do the trim there and start on the roof shingles .

Sunday, May 14, 2017

Building a Roof

Saturday was a ball buster but we did it .
Set up a couple of temporary posts to support the ridge pole at the right height .
Setting up the ridge pole .
Testing the rafter patterns we made last week for fit .
Had to go up with the ridge pole about a quarter inch but everything seemed to fit otherwise .
Then we crown , mark and cut twenty six rafters . Benjamin finish cuts the bird's mouth notch .
And Ben did a fancy stacking job of the cut rafters inside .
And we start installing rafters .
Set the the birds mouth cut out on the top plate first .
First one gets nailed onto the ridge pole .
After the first four go on the front end I switch to the back end to get the ridge pole where we need it to be .
High wire act .
That nail went in wrong .
Moving along now .
Ben caught on quickly and was starting the toe-nails on the bird's mouth so I had one less thing to mess with up high .
Alternating sides so that things don't go kadywompus on us .
Making quick headway now .
Last one goes on the left side .
Looks like a roof .
All but the end rafter tops were floating on the ridge and yet to be tacked on when I checked the walls for straight and found the left side wall bowed out about a quarter inch . So with a handy rope Ben had in his car I set up a Spanish windlass to bring it in to line with our string . And then set a temporary collar tie to keep it there .
Then I spike the tops in place . Hand nailed them as it was easier than fighting with the heavy nailgun .
By four pm I put the hustle on and we had a mad dash to get the roof sheathed . The entire roof was leaning to the back of the building about an inch and we had to bring it forward . The pole on the front was our plumb check so that we did not wind up with an out of square roof .
My nailgun is a bit worn out and does not always sink the nails so they need a whack occasionally .
Roof Monkey waits for the help to mark up the sheathing with sixteen-on-center stripes and cut us a half sheet .
Roof Monkey still waiting .
Last piece on the left side goes on .
Then we tackle the right side .
Last piece goes on the right side .
Six fifteen pm, tools packed and we have it all tarpped up for Sunday's rain .